
In my previous post about using spring security using a users database, I used a sample project which you get when downloading the spring security library. In this post, I will be setting up a spring project using maven appfuse-basic-spring archetype from scratch.
In this post I will be using the following:
At first, I've tried creating the project using the the "Create maven project" wizard you find in spring tool suite, but unfortunately that didn't go so well. What I did was that I went to the IDE, selected file->New->Other->Maven->Maven Project, and selected "appfuse-basic-spring" as the archetype to use, after finishing the wizard I got the following error:
The problem appears to be caused by STS is using an invalid archetype id for appfuse-basic-spring archetype (using appfuse-basic-spring instead of appfuse-basic-string-archetype). So in order to solve this issue, I went to the command prompt and ran the following command manually, you can read the AppFuse quick start guide for more info:
In this post I will be using the following:
- Maven 2.x. Version 3.x will cause you a headache and most probably wont work with AppFuse. I didn't dig too deep into this issue but I was unable to run the application at all.
- Spring tool suite 3.2
- OracleXE 10g with a new database schema to use. I am using a schema called CS.
- AppFuse 2.2.1
What is AppFuse?
I'll quote from the AppFuse FAQ:AppFuse is an open source project and application that uses open source tools built on the Java platform to help you develop Web applications quickly and efficiently. It was originally developed to eliminate the ramp-up time found when building new web applications for customers. At its core, AppFuse is a project skeleton, similar to the one that's created by your IDE when you click through a wizard to create a new web project. AppFuse essentially boot-strap's an enterprise-grade, best-practice, web-project leveraging Open Source Java technologies.
AppFuse 1.x uses Ant to create your project, as well as build/test/deploy it. AppFuse 2.x uses Maven 2 to create your project as well as build/test/deploy it. IDE support is much better in 2.x because you can generate the IDE project files with Maven plugins. AppFuse 1.x uses XDoclet and JDK 1.4+. AppFuse 2.x uses annotations and JDK 5+.
How to create the project?
At first, I've tried creating the project using the the "Create maven project" wizard you find in spring tool suite, but unfortunately that didn't go so well. What I did was that I went to the IDE, selected file->New->Other->Maven->Maven Project, and selected "appfuse-basic-spring" as the archetype to use, after finishing the wizard I got the following error:
Could not resolve artifact org.appfuse.archetypes:appfuse-basic-spring:jar:RELEASE
Missing org.appfuse.archetypes:appfuse-basic-spring:jar:RELEASE
The problem appears to be caused by STS is using an invalid archetype id for appfuse-basic-spring archetype (using appfuse-basic-spring instead of appfuse-basic-string-archetype). So in order to solve this issue, I went to the command prompt and ran the following command manually, you can read the AppFuse quick start guide for more info:
mvn archetype:generate -B -DarchetypeGroupId=org.appfuse.archetypes -DarchetypeArtifactId=appfuse-basic-spring-archetype -DarchetypeVersion=2.1.0 -DgroupId=com.thebinaryheap -DartifactId=spring-sample -DarchetypeRepository=http://oss.sonatype.org/content/repositories/appfuse
To explain the command:
-B : non interactive mode, or "Batch mode"
-DarchetypeGroupId : The unique identifier for the archetype your planning to use, in this case the appfuse archetypes.
-DarchetypeArtifactId : This is the part that was causing the problem in STS, notice the "-archetype" appended to the end.
-DgroupId : The unique identifier for the archetype your trying to generate
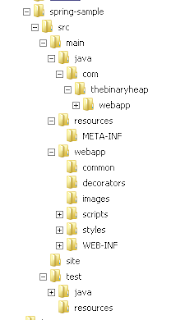
After running this command, you should be able to see the following folder structure in the newly created project:

Plus, if you look into the folder contents, you will find many things that are ready for use by default, such as basic authentication and internationalization.
Now you'll need to run the following command in the root folder of your project to download the source, which is unnecessary but very useful:
mvn appfuse:full-source
Now you'll need to run the following command in the root folder of your project to download the source, which is unnecessary but very useful:
mvn appfuse:full-source
Now you'll need to do the following configuration in order to make the application run:
In order to run the application, run the following command in the root folder of your project:
mvn jetty:run
You can access the application by typing http://localhost:9091 into your browser (or whatever port your using for jetty).

Now start up the STS IDE, and import the newly created Maven project by using file->Import->Maven->Existing Maven Project , select the root folder of your project and the new project will be listed as the following screenshot shows

Check the project pom and click on finish, the project will be imported into your workspace.
- Since we are using Oracle as our database, you'll need to make the ojdbc14.jar file available to Maven. ojdbc14.jar is not available in the any public repository due to licensing issues. I've found this stackoverflow thread helpful in how to add this jar file to the project. What I did was the following:
- Ran the following command
mvn install:install-file -DgroupId=com.oracle -DartifactId=ojdbc14 -Dversion=10.2.0.2.0 -Dpackaging=jar -Dfile=ojdbc.jar -DgeneratePom=true
where -Dfile points to the location of the ojdbc.jar file in your OracleXE installation. This will add the jar to .m2\repository\oracle\ojdbc14\10.2.0.2.0 folder. - Added the following repository to the pom.xml
<repository>
<id>local</id>
<url>file://C:\Users\u\.m2\repository\oracle\ojdbc14\10.2.0.2.0</url> </repository> - After that, I've changed the "database settings" section within the pom to use the oracle groupId
- Since OracleXE will be using the 8080 port, you will need either to change its port or the port that jetty uses. I've changed the jetty configuration to the following in my pom.xml file:
In order to run the application, run the following command in the root folder of your project:
mvn jetty:run
You can access the application by typing http://localhost:9091 into your browser (or whatever port your using for jetty).

Now start up the STS IDE, and import the newly created Maven project by using file->Import->Maven->Existing Maven Project , select the root folder of your project and the new project will be listed as the following screenshot shows

Check the project pom and click on finish, the project will be imported into your workspace.
No comments:
Post a Comment